Atomic Absorption Spectroscopy
Atomic absorption spectroscopy (AAS) is a widely
used technique for determining a large number of metals. In the most common
implementation of AAS, a liquid sample containing the metal analyte is
aspirated into an air-acetylene flame, causing evaporation of the solvent and
vaporization of the free metal atoms. This process is called atomization. A
line source (hollow cathode lamp) operating in the UV-visible spectral region
is used to cause electronic excitation of the metal atoms, and the absorbance
is measured with a conventional UV-visible dispersive spectrometer with
photomultiplier detector. Figure 1 is a typical instrument block diagram. The
light beam passes through the cloud of atomic vapor formed in the flame. The narrow
spectral lines of gas-phase atomic samples necessitate the use of a line source
as well as a high-resolution monochromator (i.e., a spectrometer capable of
isolating a very narrow (e.g., < 1 nm) wavelength range). This helps to
prevent interference from adjacent spectral lines of other atomic species
present in the sample matrix. This allows a metal species to be
analyzed directly in a complex sample without the need for performing
separations. In this experiment, AAS in conjunction with flame atomization will
be used to determine iron in the solution obtained through digestion of the
unknown.
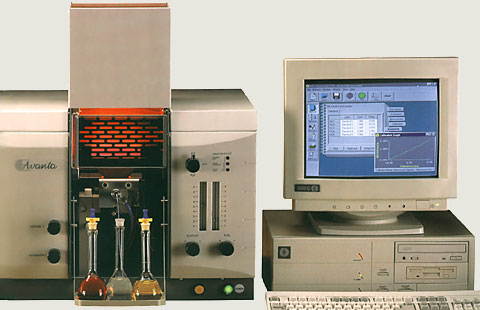
GBC Avanta
Atomic Absorption Spectrometer Located in CTH 321
AAS Operation
Procedure
Upali Siriwardane
Modified 3/16/04
1. Make sure that computer
is running the GBC software (double-click icon on Windows 95 desktop) and that
the spectrometer is on (on/off button on side of AAS). Also, turn on the fuel
and oxidant on the regulators on the tanks connected to the nebuliser (check
both gauges on each tank).
2. Choose the Application
Editor option to adjust settings for data collection:
Name—Choose a file name for your
settings
Element—Type the abbreviation for
the element in your solution
Matrix—The solvent you are using
(probably water)
Wavelength—select an appropriate
wavelength for your element and concentration range
Slit
width—given
for each element
Slit
height—Normal
setting
Measurement
Mode—Integration
Calibration
Parameters—
Calibration Mode = Concentration
Flame
Parameters—
Flame
type = Air
or N2O/Acetylene
Acetylene and
Oxidant Flow =
set ratios for reducing or oxidizing
flame according to element
(more air/N2O = oxidizing, more fuel =
reducing) Burner Angle = 0.0 degrees
Data Collection
Parameters—Replicates = machine will take average
of this number of measurements (5 is a common number)
Read Time = time in between replicate
measurements (3 sec is common)
These parameters can be
saved by hitting Enter at the Save Parameters option and can be
recalled later by selecting
Load Parameters on the Main Menu.
3. Open the lamp door on the
left side of the spectrometer and turn the lamp holder to where the lamp
labeled with the desired element is closest to you (the machine should prompt
you to do this).
4. To perform a measurement
run, choose the Run Parameters option from the Main Menu. Set the analysis mode
at Random and the sampling mode at Manual (since this spectrometer is not
equipped with a peripheral sample changing device).
5. Before you light the
flame, ensure that the correct burner for your oxidant (air or N20) is in the nebuliser. To
change the burner, pull the burner plug out of the right side of the burner compartment,
turn the burner counter-clockwise and pull it out. Put the desired burner in place,
turn it clockwise to lock into place, and plug into flow lines. Ensure that the
burner is in the correct position by placing a white card over the burner slot.
Use the Horizontal and Vertical adjustment knobs to adjust until the beam is
parallel with and about 1 cm above the burner slot. The deuterium knob next to
the cathode lamp can also be adjusted.
6. To ignite the flame, push
the ignite button on the side of the AAS to light. Make sure that the flame
sustains for about 20 seconds before continuing. The flame should be fairly
small with little or no yellow color at the top and slightly pinkish at the
bottom. The bright blue band at the bottom should be as thin as possible. To
set the flame accordingly, adjust the gas flow of the air, acetylene, and
nitrogen tanks using the knobs on the tanks themselves, as well as adjusting
the air/acetylene ratios on the computer under Flame Parameters.
7. Select the Alignment option
on the Main Menu. This will display two dials that gauge the amount of signal
reaching the spectrometer. With one of your samples aspirating (a
moderate concentration) (see
#8- instructions for aspirating) adjust the Vertical alignment to where the dial
on the left is approximately in the middle of the gauge while not decreasing the
reading on the dial on the right. This is to ensure that extremely high/low
concentrations do not read absorbances that are too close to the
maximum/minimum sensitivity of the spectrometer. (See Minimum Measurable
Absorbance section of discussion). Also ensure that this does not disrupt
previous alignment performed in step 5.
8. When you are ready to
begin the calibration procedure, hit F2 to go to the results screen. Hit F10 to
take data on a sample. The machine will ask for the sample in a new dialog box.
At the beginning of your runs, you should test a water sample as a blank.
Select the Solution as Cal Blank. On the nebuliser, make sure that the
apparatus is aspirating by watching for fluid coming out of the trap into the
waste tube (or by aspirating a concentrated sodium solution.
The flame will turn bright
yellow). Place the capillary tube in DI water (idle machine should already be
aspirating water). Select Read on the dialog box. The AAS will collect the specified
number of measurements and average them. This will zero the machine.
9. Aspirate each calibration
standard in the same manner, only choosing Sample as Solution. Wipe off the
capillary tube with a Kim-wipe and place it back in DI water between each standard.
10. After you have taken
data on all standards, plot the absorbance vs. concentration on Excel or other
data program. If the machine is working properly, the data should be relatively
linear. (For sample plots, see Appendix 3.) If the data is not linear, then
certain parameters will have to be varied to make data more linear for the
determination of unknown concentrations
with Beer’s Law (see
discussion).
11. To turn the machine off,
extinguish the flame by pressing the ignite button on the AAS. Turn off the
pressure on regulators on the fuel and oxidant tanks. Then select the Bleed
Lines option from the Flame Parameters option in the Applications Editor. This
will remove any excess gas from the system. Exit the GBC software by hitting
Escape (ESC) until the system goes back to Windows.
Common Problems and
Fix-it Strategies
Problems with the
instrument
1. Many different problems
are possible if the flame will not light or will not remain lit. In order to
diagnose these problems, go to Status under Flame Parameters in the
Applications Editor and attempt to ignite the flame. Under Last Shutdown, the
reason for shutdown will be given. Some of the more common ones were:
(a) Low level in trap— need to refill the liquid
trap with whatever solvent you are
using. Unscrew the white cap
on the top of the trap and use a funnel to pour solvent until you see it
leaking out of the waste tube. It also necessary to periodically make sure that
the waste tube is not backed up and empty it into the waste sink.
(b) Insufficient
fuel/oxidant or low pressure — make sure that regulators show
flow of both fuel and
correct oxidant. Check for leaks in fuel line and regulator connections using
soapy water.
(c) Burner is not
connected—after
switching burners the burner plug may not
have been plugged in, doing
this will solve the problem. Additionally, the air current in the hood is
sometimes strong enough that it interferes with the ignition flame itself,
pulling it away from the fuel flow out of the burner. To minimize this,
cover the opening with a
piece of paper while igniting.
2. It is also important to
make sure that the aspiration rate is sufficiently high to get sample into the
nebuliser. Under normal conditions, the capillary tube should evacuate almost immediately
when removed from solution or water. If this is not the case, there are a few steps
that you can take:
(a) Make sure that the
aspirator knob is turned sufficiently far to the left (too far
to either side will not
allow proper aspiration).
(b) Make sure that the
capillary is clean and not clogged with solid deposits.
(c) As a “last resort”, you
can manually evacuate the tube in between each sample
by pulling the tube off the
nebuliser and holding the capillary tube to the
house vacuum in the vent
hood, creating a seal around the outside with your
fingers.
3. Soot and corrosion can
also collect on the slit in the burner, creating a non-uniform flame that can
interfere with measurements. Periodically, the burner slit needs to be cleared
by sliding a small card back and forth through the slit WITH THE FUEL/OXIDANT
FLOWS
OFF.
4. If after taking a sample
absorbance the absorbance value is very low (<.010) or entirely out of range
with expected values, the error message “HC low lamp intensity” may be given.
It is likely that the burner is improperly aligned assuming all other
parameters are correct (may need to check aspiration rate). Refer to steps 5
and 7 of the Procedure for instructions. It is also possible that the lamp has
burned out and needs replacing. (Lamps on average last about 2 years.)
Problems with the
computer program
1. A common error message,
“Absorbance not increasing with concentration,” is often given even when the
absorbance is in fact increasing. The program will prompt you to hit the space bar
to clear. If you do this and attempt to run another standard or sample, the
machine will take your standard/sample and zero it. The best option is to
ignore the message and continue running your standards/sample by hitting F10.
2. It is easier to keep
track of calibration tables and parameters by creating a new method each time
you run a different standard curve or standard addition on the machine. The
program has a tendency to default to the first calibration tables and standard
readings performed, as well as requiring you to recalibrate any time your
standard run is interrupted or you want to run a new set of standards. Simply
type a new name after “name” in the Application Parameters menu and save.
Remember to name and save your calibration table as well.