 Although
it existed as an ignored, accidental byproduct of copper smelting, true
glass probably was first made in western Asia, perhaps Mesopotamia,
at least 40 centuries ago.
Although
it existed as an ignored, accidental byproduct of copper smelting, true
glass probably was first made in western Asia, perhaps Mesopotamia,
at least 40 centuries ago.
History of Glassmaking
That said, no one really knows how glass came to be made. It is thought
that the ability to make glass developed over a long period of time from
experiments with a mixture of silica-sand (ground quartz pebbles) and an
alkali binder fused on the surface. The material called faience had been
used for well over a thousand years to make small decorative objects such
as beads and amulets.
Although
it existed as an ignored, accidental byproduct of copper smelting, true
glass probably was first made in western Asia, perhaps Mesopotamia,
at least 40 centuries ago.
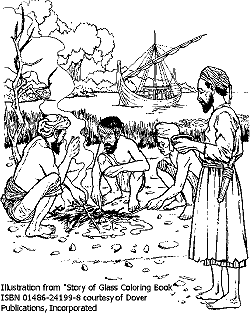
Perhaps early development began with potters firing their wares. Could the first glass have been colorful, hard, shiny decoration fused to a clay pot's surface in the heat of the furnace? No one knows. It was later discovered that if the material were thick enough, it would stand by itself. Pieces of solid glass could then be ground to shape by grinding it with stones, or sand and water, to produce vessels.
 As
early as 3,300 years ago, secret "instructions" for furnace building and
glassmaking in Mesopotamia were written on clay tablets in a cuneiform
script. These instructions were copied and recopied over the centuries.
Furnace-building instructions from that time period have not been discovered.
The cuneiform tablet pictured on the left of this page is probably
about 2,700 years old. Typical instructions for glassmaking follow:
As
early as 3,300 years ago, secret "instructions" for furnace building and
glassmaking in Mesopotamia were written on clay tablets in a cuneiform
script. These instructions were copied and recopied over the centuries.
Furnace-building instructions from that time period have not been discovered.
The cuneiform tablet pictured on the left of this page is probably
about 2,700 years old. Typical instructions for glassmaking follow:
When you set up the foundation of a good furnace to make glass, you first search in a favorable month for a day of good omen, and only then can you set up the foundation of the furnace. As soon as you have finished building the furnace you go and place Kubu-images there. No insider or stranger should enter the building; an unclean person must not even pass in front of the images. You regularly perform libation offerings before them. On the day when you plan to make (glass), you make a sheep sacrifice before the Kubu-images (religions statues); you place juniper incense on the incense burner; you pour out a libation (drink honoring a deity) of honey and liquid butter; only then can you make the fire in the hearth of the furnace and place the glass in the furnace.
The wood that you burn in the hearth of the furnace should be thick, peeled poplar wood, which has no knots, bound together with leather straps, cut in the month of the Abu (July or August). Only this wood should be in the hearth of the furnace. The persons whom you allow to come near the furnace have to be clean; only then can you allow them to come to the furnace.
If you want to produce zagindurû-colored (blue) glass, you finely
grind separately, ten minas (about one pound) of immanakku-stone (quartz),
fifteen minas of naga-plant ashes, and 1 2/3 minas of 'white plant.' You
mix these together. You place the mixture into a cold furnace that has
four openings, and you arrange the mixture between its openings. You keep
a good and smokeless fire burning....As soon as the mixture glows yellow,
you pour it on a kiln fired brick and this is called zukû-glass....
Click
here to go to a website of modern glass making
Scientific Glassblowing
Click
here to to this wensite for more details of Scinetific glass blowing
Glass is widely used in science and industry because of its three main
attributes: it is transparent; it is inert to most chemicals; and it is
malleable. In the trained hands of an experienced scientific glassblower,
glass can be manipulated into the numerous shapes required for use
in research and commerce. Not only can scientific glassblowers create
items made of glass, their extensive knowledge of glass science can be
pooled with the knowledge and experience of a researcher or industry leader.
Glassblowing is a scientific art. A glassblower of today manipulates hot,
malleable glass by using the same skills and techniques similar to those
used by Egyptian craftsmen of ancient times. However, unlike earlier craftsmen,
whose selection of glass was based on how it looked (i.e., color),
the scientific glassblower of today selects glass on how it will
be used. Todays glassblower may select glass based on heat requirements,
chemical inertness, or ability to fuse to metals. The average persons
image of glassblowing is that of molten glass drawn on the end of a long
steel pipe as it is pulled from a fiery furnace. This is quite different
from modern scientific glassblowing with precision equipment, advanced
torch designs, digitally controlled ovens, and often a computer. Although
the scientific glassblower of today uses highly sophisticated equipment,
the responsibilities of the scientific glassblower are
just as they were in the past: to assist the researcher. For example, it
was a glassblower who coiled a long tube of glass for Galileos thermometer,
and it was other glassblowers
who helped construct the light bulb for Thomas Edison (as well as the necessary
glass vacuum pumps). Similarly, glassblowers played critical roles in assisting
Ferdinand Braun as he developed the cathode-ray tube,
and other glassblowers were directly involved in the cathode-ray tubes
evolution to the television.
Types
and Chemistry of Glasses
Glass is a state of matter. Glasses combine some properties of crystals
and some of liquids but are distinctly different from both. Glasses
have the mechanical rigidity of crystals, but the random disordered arrangement
of molecules that characterizes liquids. Glasses are usually formed by
melting crystalline materialswhich are called FORMERS at very high
temperatures. Most commercial glass is made with sand that contains
the most common FORMER, Silica. Other FORMERS include: Anhydrous Boric
Acid Anhydrous Phosphoric Acid But melting sand by itself is too expensive
because of the high temperatures required (about 1850°C, or 3360°F).
When the melt cools, the atoms are locked into a random (disordered) state
before they can form into a perfect crystal arrangement.
Traditional glass is made today by melting quartz or sand at a very high
temperature and molding it into shape. Glass without any additives are
called quatrz glass. They have very high melting points and requires
extra hot flames to work with during galssblowing. But melting sand by
itself is too expensive because of the high temperatures required
(about 1850°C, or 3360°F). Therefore, FLUXES are added which
let the FORMER melt more readily and at lower temperatures
(1300°C, or 2370°). These include: Soda Ash (Na2O),
Potash (K2O), lime (CaO) and Lithium Carbonate(Li2CO3.)
However, FLUXES also make the glass chemically unstable, liable to
dissolve in water or form unwanted crystals. Therefore, STABILIZERS
are
added to make the glass uniform and keep its special structure intact.
These include: Limestone, Litharge, Alumina,Magnesia,
Barium Carbonate, Strontium Carbonate,Zinc Oxide, Zirconia
Glass has no specific melting point and there is a wide temperature range
in which the glass can be shaped. This way of making glass is very expensive
because of the high temperature needed in melting. Soda ash (Na2CO3)
and lime (CaO) can be added to the quartz to lower the melting temperature
and creating the most common form of glass called soda-lime glass.
Which is what windows and bottles are made of. Making glass this way can
result in a very impure glass. Glass consists of covalently bonded Silicon
and Oxygen atoms with positively charged metal oxides bonded within the
oxygen-silicon matrix. (tetrahedrally bonded)
Nearly all commercial glasses fall into one of six basic categories or
types. These categories are based on chemical composition. Within each
type, except for fused silica, there are numerous distinct compositions.
1. Soda-lime glass is the most common (90% of glass made), and least expensive form of glass. It usually contains 60-75% silica, 12-18% soda, 5-12% lime. Resistance to high temperatures and sudden changes of temperature are not good and resistance to corrosive chemicals is only fair.
2. Lead glass has a high percentage of lead oxide (at least 20% of the batch). It is relatively soft, and its refractive index gives a brilliance that may be exploited by cutting. It is somewhat more expensive than soda-lime glass and is favored for electrical applications because of its excellent electrical insulating properties. Thermometer tubing and art glass are also made from lead-alkali glass, commonly called lead glass. This glass will not withstand high temperatures or sudden changes in temperature.
3. Borosilicate glass is any silicate glass having at least 5% of boric oxide in its composition. It has high resistance to temperature change and chemical corrosion. Not quite as convenient to fabricate as either lime or lead glass, and not as low in cost as lime, borosilicate's cost is moderate when measured against its usefulness. Pipelines, light bulbs, photochromic glasses, sealed-beam headlights, laboratory ware, and bake ware are examples of borosilicate products.
4. Aluminosilicate glass has aluminum oxide in its composition. It is similar to borosilicate glass but it has greater chemical durability and can withstand higher operating temperatures. Compared to borosilicate, aluminosilicates are more difficult to fabricate. When coated with an electrically conductive film, aluminosilicate glass is used as resistors for electronic circuitry
5. Pyrax or Borosilicate: Another property of the glasses is varying thermal heat of expansion rates. Knowing these rates can tell you what types of glass will shatter when heated or cooled rapidly. One that you probably all ready know of is Pyrex, which is a borosilicate glass. This glass has the compound B2O3 in the matrix. Ninety-six percent silica glass is a borosilicate glass, melted and formed by conventional means, then processed to remove almost all the non-silicate elements from the piece. By reheating to 1200°C the resulting pores are consolidated. This glass is resistant to heat shock up to 900°C.
6. Quartz is fused silica glass is pure silicon dioxide in the non-crystalline state. It is very difficult to fabricate, so it is the most expensive of all glasses. It can sustain operating temperatures up to 1200°C for short periods.
Properties of Glass
| Soft Glass
(Soda Lime) |
Borosilicate
(Duran, Kimax, Pyrex) |
Quartz
(Fused Silica) |
|
| Softening Range | 696 C | 821 C | 1580 C |
| Working Range | 1000 C | 1200 C | 1800 C |
| Annealing Range | 514 C | 565 C | 1050 C |
| Max. Service Temp. | 450 C | 490 C | 1100 C |
MECHANICALY STRONG
Has great inherent strength. Weakened only by
surface imperfections, which give everyday glass its fragile reputation.
Special tempering can minimize surface flaws.
HARD
Surface resists scratches and abrasions.
ELASTIC
Gives under stress - up to a breaking point -
but rebounds exactly to its original shape.
CHEMICAL CORROSION- RESISTANT
Affected by few chemicals. Resists most industrial
and food acids.
THERMAL SHOCK- RESISTANT
Withstands intense heat or cold as well as sudden
temperature changes.
HEAT - ABSORBENT
Retains heat, rather than conducts it. Absorbs
heat better than metal.
OPTICAL
Reflects, bends, transmit and abosorb light with
great accuracy.
ELECTRICAL INSULATING
Strongly resists electric current. Stores electricity
very efficiently.
Equipment, Material, Tools and Terminology
Anneal
Term used to describe the process of removing stresses
introduced into the glassware during the glassblowing process.
Annealing Point
Temperature at which the stress in glass is removed. Annealing
point temperatures will be different for each type of glass.
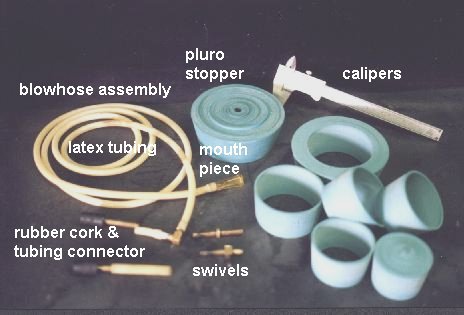
Blowhose Assembly
The blowhose is what you blow air through to shape the
glass. The blowhose will have a mouthpiece at one end and a swivel at the
other. The swivel is a device that allows the rotation of glass that will
be blown. The swivel is connected to the glass by latex or rubber tubing
or a stopper/tubing assembly. The blowhose is usually about six (6) feet
long and 3/16" ID. Latex is commonly used because of its light weight and
low cost.
Borosilicate Glass
The type of glass most commonly used in the laboratory
today is from the borosilicate glass family. Trade names you may be more
familiar with are PYREX (Corning), KIMAX (Kimble) and DURAN (Schott). In
scientific glassblowing the glass used comes in tubing, rod or sheet form.
It is usually four (4) feet in length. The diameters are expressed in millimeters.
Burners
Burners are usually designed for stationary use at the
bench or lathe. The glass being worked is moved into and around the flame.
Flame size is determined by valves that adjust the flow and mix of fuel
gas and oxygen.
Calipers
Tool used to measure the internal diameter and/or
the outside diameter of glass tubing or rod, and wall thickness.
Corks
Fixed size stopper for temporarily sealing openings in
the glass.
Cutting Tool
An instrument used to scratch the surface of glass tubing
or rod. See Tungsten Carbide Knife.
Diamond Scribe
Hand held instrument with a diamond point used to make
a permanent mark on glass.
Didymium Eyeglasses
Didymium lens protect your eyes from certain visible and
UV light produced in the glassblowing process. They enable the glassblower
to see the glass while it is being worked in the flame.
File
Files may be used to scratch the glass tube or rod surface.
Three corner (triangle) files are the easiest to use.
Fire Polishing
Term used to describe the process using a flame to smooth
the ends of glass tubing or rod.
Flint Lighter
Hand held tool used to create a spark - igniting your
torch or burner.
Fused Silica
Glasses in the Quartz family.
Glass/Ceramic Tape, Tubing and Pads
Asbestos substitute - Used as spacers, supports, insulators,
etc. while glassblowing
Graphite/Carbon Rods and Shapers
Used to form or shape hot glass. These hand held tools
may be found in rod, flat , taper and custom forms.
Hand Tools
Hard Glass
Term used by glassblowers to generically describe glass
in the borosilicate family.
Hot Glass Rest
Any object made of non-flammable material used to hold
or contain hot glass.
Hydrogen
Fuel gas mixed with oxygen to generate temperatures hot
enough to work quartz.
ID
Inside Diameter
Markers
Wax pencil or inks used in identifying specific points/information
on glassware. Marks may or may not be permanent after exposure to heat.
Natural Gas
Fuel gas mixed with oxygen to generate temperatures hot enough to work
borosilicate glass.
OD
Outside Diameter
Oxygen
Gas mixed with hydrogen, natural gas or propane. Enhances
the combustion process.
Pluro Stopper
An adjustable size rubber stopper used in sealing openings
in glass.
Propane
Fuel gas mixed with oxygen to generate temperature hot
enough to work borosilicate glass.
Quartz
Family of glass that is almost pure silica. Used extensively
in the semi-conductor industry and for high temperature applications.
Regulator
A single or double stage pressure control device installed
in a gas manifold, gas delivery line or on a compressed gas cylinder.
Ring Stand and Clamp Assembly
A common laboratory stand used with an adjustable clamp
to hold glassware stationary. The clamp fingers should be covered or protected
from the direct flame of your torch. Soft flexible braided glass/ceramic
tubing is available for this purpose.
Rotate
The process of continually turning glass tubing or rod
when it is in the flame or in a softened state.
Soft Glass
Term used by glassblowers to describe glasses in the soda-lime
family.
Softening Point
Temperature at which glass will sag under its own weight
under certain conditions.
Strain or Stress
Term used to describe tension or compression in glass
developed during the heating and cooling stages of the glassblowing process.
Stress points or areas in glass are potential fracture sites.
Thermal Shock
Sudden, rapid cooling or heating of glass surface that
may produce cracks or fractures.
Torch
Torches are usually hand held. Unlike stationary burners
(glass is moved into the flame), the torch is moved around the glass, which
is stationary.
Tungsten Carbide Knife
Hand tool used to create a scratch on the glass wall surface.
Tungsten Pick
Hand held tool used to "sew" small holes and cracks in
glass together. A sharpened tungsten rod (1/16 - 1/8"OD) is attached to
a handle, preferable one that does not transmit heat. This tool should
be about 6 -10 inches in overall length.
Working Range
Temperature at which glass is hot enough to shape and
seal or bond.
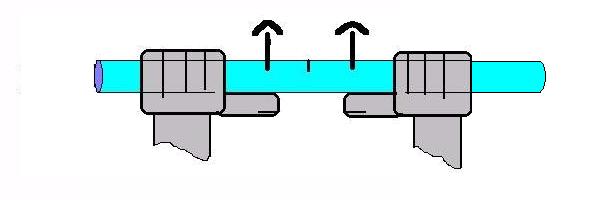
Cutting Glass
Glass tubing and rod come in four (4) foot lengths and metric diameters.
Four feet of tubing is rather awkward to handle in the flame so we need
to cut it down to a manageable size. Select tubing of 10 mm OD and place
on a flat surface. Mark the glass into 16 inch lengths.
1. Create a scratch on the glass wall surface by drawing the corner
of
a file or tungsten carbide knife perpendicularly across the tube.
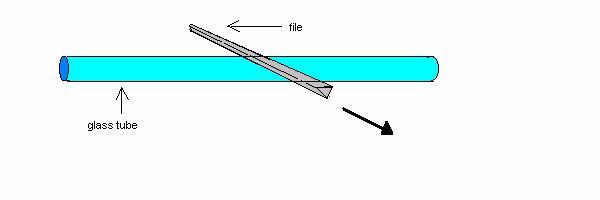
2. Pick up the glass tube and wet (water, saliva) the scratch with your
finger. Turn the scratch away from your body.
3. Place your thumbs on the glass tube. The scratch should be located
between the thumbs but on the opposite side of the tube.
4. Push your thumbs away from you. The glass tube should break cleanly
at the scratch.
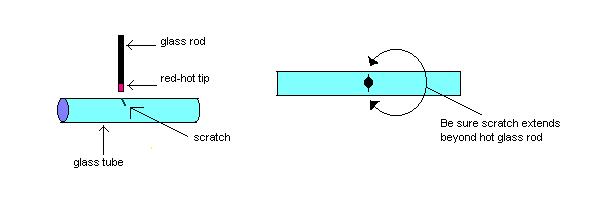
Another Option.
This option is useful on large tubing or when repairing vacuum lines
or apparatus. This method should be tried after you have had some experience
handling the torch.
1. Scratch tubing with file or carbide knife.
2. Wet scratch.
3. Heat the end of a 6 mm rod red hot - quickly place the end of the
hot rod onto the wet scratch - be sure the scratch line extends beyond
the contact area of the hot rod.
Tip: If done correctly you will observe a crack forming at and
extending from the scratch. If the crack does not travel completely around
the circumference: Tap the crack lightly. This action may chase
the crack around the tube.
Or, reheat the glass rod and reapply
to the crack. Again, be sure the rod does not extend beyond the
end of the crack.
Burners and Torches
Torches and burners will be described as being surface-mix or pre-mix.
The difference is where the mixing of the fuel gas and oxygen take place.
Remember, your torch will be burning oxygen and propane or natural gas.
Do not use torch components designed for use with air.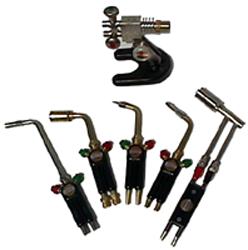
Pre-mix torches as a rule are capable of burning a little hotter with a
flame that can be very concentrated. Gas and oxygen are mixed in a chamber
within the torch body. This style torch is preferred when making seals
and/or when heating small concentrated areas. If you were to be restricted
to using only one torch, the pre-mix is recommended. Premix torches have
the benefit of having interchangeable tips, allowing the user the option
of changing flame characteristics over a broad range.This relatively inexpensive
torch, with tip sizes #2,3,4,and 5 will cover most of your needs.
Surface-mix
torches and burners are used most frequently when large areas of glass
need to be worked. Oxygen and fuel gases are mixed at the torch tip. The
flame characteristics tend to be broader and softer, with less velocity
than a comparable sized flame from the pre-mix torch. This is a good torch
to use when preheating a large piece of glass apparatus for repair, or
when shaping large tubing.
There are many other makes and models of burners and torches available
to the glassblower. Their different flame and body characteristics determine
their application in the glassblowing field.
Torches (handheld) may be used as burners by simply hanging or attaching
them to some sort of fixture. This fixture may be something as simple as
a ring-stand and clamp assembly or a custom made unit that will hold the
torch in a safe and secure manner.
Light Up
1. Confirm gas delivery systems are in safe operating condition. Set
regulators at 5 psi gas and 10 psi oxygen.
2. Open gas valve full turn to purge air from the line and then quickly
close valve.
3. Repeat step 2 with the oxygen.
4. Open gas valve approximately 1/4 turn - ignite gas with flint lighter.
5. The torch is lit! Adjust the gas valve to produce a flame about
3/4" long. This is known as a pilot flame. You may leave the torch flame
at this position when not in use - but always attended.
Tip: If you experience difficulty in immediately igniting the
gas beware of excessive gas buildup. Shut the gas valve off and wait a
few minutes to allow the gas to dissipate. Attempt to light the torch again
using a different setting on the gas valve.
Adjusting Flame Size
1. Gas first - open valve
to create a flame length about 6" long (about the
length of your hand). The
flame should be still attached to the torch tip. If there
is a space greater than
1/8" between the flame and torch tip adjust (close) the
gas valve until the flame
"re-attaches" to the tip.
2. Slowly open the oxygen
valve on the regulator. Observe how the flame changes in shape,
velocity and heating characteristics.
3. Practice flame control
by changing the settings on the gas and oxygen
valves. Make the smallest
flame possible, using an inch long flame as a target.
Now attempt to create the
largest flame possible. Try different tip sizes to
observe the flame size range
each produces.
Shutting Down the Gas Delivery
System.
To shut down and relieve
all positive pressure from the gas delivery system:
1. Close valve at the gas
source.
2. Open valves at the torch
and burn off released gas.
3. Back off pressure adjusting
screw at the regulator(s).
Determine the Correct Flame Size
Flame sizes are determined by what you are attempting to do with the glass. Only glass that has been heated to the working point range will be soft enough for you to form into the shapes or seals desired. Heating an area of glass 10 mm in diameter means only 10 mm of glass will be hot enough to to shape or form. Logically it would follow you do not heat an area 30 mm in diameter to seal on a tube that is only 10 mm OD. Match the area of hot glass to the size of the seal.
Flame intensity is a factor in determining how quickly the glass reaches working point temperatures. Experience will guide you in choosing the proper flame intensity and flame size to apply to the different types of seals. Each person will develop their own style and technique in using the torch. The information presented here should serve as a starting point.
Blowing Glass BubblesThis demonstration allows students of all ages to actually experience glassblowing . The participants do not handle the hot glass or the torch, and do not come close to the flame. The key is to have a rather long blowhose (with individual throw-away mouthpieces), keeping your students away from the hot glass and flame, but still close enough to observe the glass reacting to the "blowing" into the blowhose.
Suggestions:
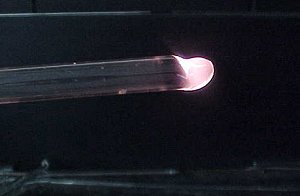

Fire Polishing and Annealing
Fire polishing the ends of glass tubing and rod will seal small cracks
in the end wall, reducing the chance of fractures originating from this
source. Fire polishing ends will also reduce cuts and abrasions to you
or anything (corks, latex tubing, etc.) coming in contact with the glass
end.
1. Cut 10 mm tubing into 16 inch lengths (or use tubing from previous
lesson).
2. Light and adjust torch flame (sharp/soft).
3. Fire polish by rotating the glass tube end in the flame.
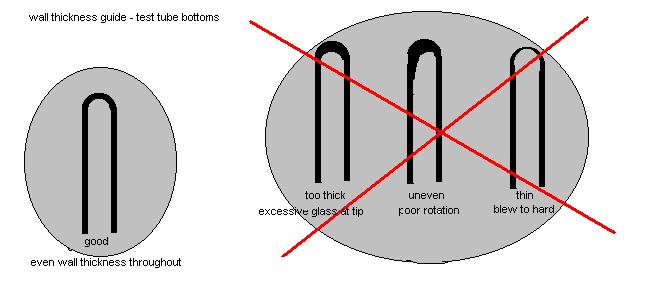
A good fire polish has a smooth finish and the ID and OD of the glass
tube remains unchanged.
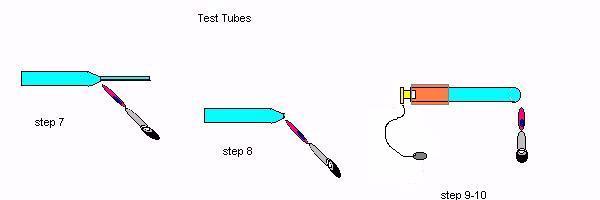
Test Tubes or making one end of a glass tube sealed
Test tubes are relatively easy to make, frequently used, and give you
an opportunity to practice rotation and fire polishing skills. This exercise
will introduce you to the process of blowing into the glass, forming and
shaping the tube end.
1. Select 10 to 18 mm OD tubing - 16 inch lengths with fire polished
ends.
2. Light torch and adjust flame to match tubing diameter.
3. Grasp tubing with both hands - rotate.
4. Place rotating tube in flame at the half-way (8") point.
5. When the tube softens (cooked noodle au dente?) and constricts to
half its original diameter, remove from the flame, do not stop rotating,
and slowly pull about 6" apart.
6. Place tubing back into flame and burn off into two equal lengths.
This exercise is known as pulling points. Place the points on the
hot glass rest to cool.
7. Adjust your flame to a sharp/intense profile.
8. Place the shoulder of the glass point into the flame at an angle
- rotating at all times - and pull off the excess glass, leaving
a semi-rounded bottom.
9. Attach the blowhose assembly to the glass tube.
10. Reheat the tube bottom to the working point temperature and blow
(little puffs), shaping the tube bottom.
11. Anneal

Joining two straigt tubes or
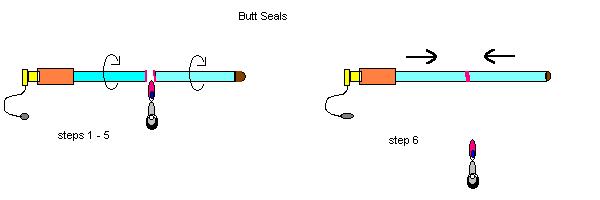
Butt Seals
Butt Sealing is the process
of joining two sections of glass tubing together - end to end. This exercise
demonstrates the joining of two similar size tubes together. A variation
of this seal would be the joining of two dissimilar size tubes. Two
options are offered - one requires good rotational skills.
1. Cut tubing into 8" - 12" lengths, fire polish ends.
2. Attach blowhose assembly to one tube.
3. Seal second tube with a cork or use a test tube bottom from the
previous lesson.
4. Light torch and adjust flame.
5. Rotate ends of glass tubing (as if fire polishing) in flame.
6. When tube ends are red hot remove from flame, stop rotating, push
tubes together making contact all around.
Another Option
This option does not require rotation. It does require the glassblower
to hold and manipulate the torch around the glass tube that is held in
a standard laboratory ring stand.

1. Clamp tube #1 vertically in a ring stand. Tube end about chin high
with blow hose attached.
2. Hold in one hand the torch adjusted to a sharp flame. A sealed tube
(#2) is held in the other hand.
3. Sweep flame back and forth across the end of tube #1, concentrating
on the back half of the tube.
4. Tube #2 is simultaneously held directly above tube #1 at a slight
angle. This tube will also be heated as in step 3.
5. Bring tube #2 down contacting the back of tube #1, continue to sweep
flame back and forth across the tube ends.
6. Continue to bring tube #2 down onto #1 making complete contact around
the circumference. With practice steps 5 and 6 are completed in a quick
smooth continuous motion.
7. Using a small sharp flame, work out the seal by heating small sections
of the seal at a time.
8. Anneal

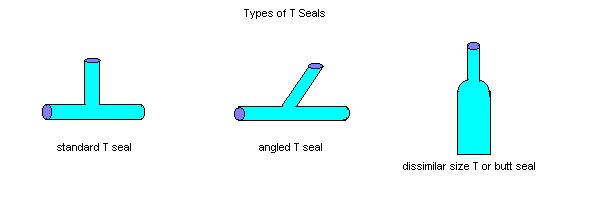
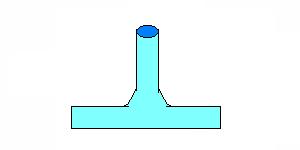
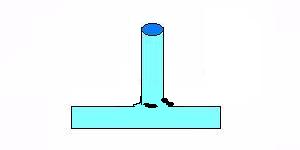
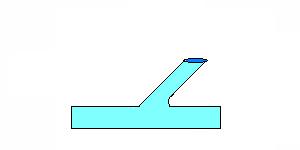
T Seals
T seals are simply two tubes sealed together at right angles.
Modified T seals may have the glass tubes at any angle degree, the basic
technique being the same. Joining dissimilar sized tubes end to end may
be more appropriately classified as butt seals, but for our purposes are
carried in this section because the technique shown is similar to the T
seal.
1. Clamp a sealed 10 mm tube horizontally in a ring stand. Attach blowhose
assembly to tube.
2. Light and adjust torch to a sharp flame. Remove from holder.
3. Heat a 10 mm spot on top of tube.
4. Remove torch flame - blow out a bubble about 10 mm in diameter (do
not pop).
5. Reheat bubble and let glass collapse to a flat even plateau, remove
torch. Sides of plateau should be about 3 mm high.
6. Reheat plateau, remove torch and blow a second bubble, (do not pop).
7. Position flame to cross over the top of the bubble, blowing hard
at the same time to pop bubble.
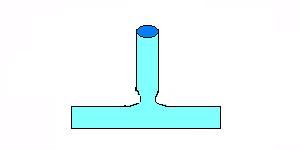
8. Melt glass evenly down, forming a hole 10 mm in diameter with level
3 mm high side walls.
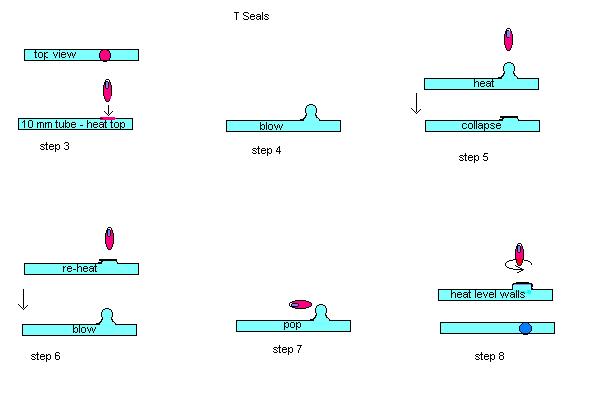
| Tip: Re-blowing the bubble in steps 5 and 6 will help build
up the wall thickness at the point where the second tube is sealed. It
is important not to skip this step!
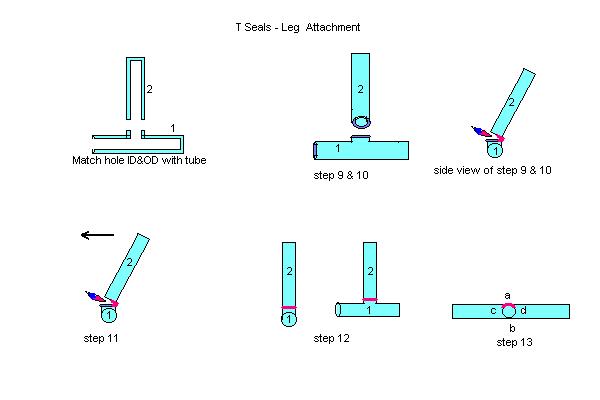
Use a second 10 mm piece of tubing as the leg that will be attached to tube #1. If you have performed steps 3 -8 correctly you should have a very close match of the ID and OD of the hole in tube #1 to the end of tube #2. |
| 9. Hold tube #2 above and at a slight angle to the 10 mm hole in tube #1 you have blown in step 8. |
| 10. Move the torch flame back and forth across the rear of the hole and the leg. |
| 11. Bring the back of tube #2 down onto the back of the hole in tube #1. |
| 12. Continue heating and bring tube #2 forward in a continuous smooth motion, making complete contact with the base. |
| 13. Work out the seal a small section at a time (see step 7 of stationary butt seals). |
| 14. Anneal |
 |
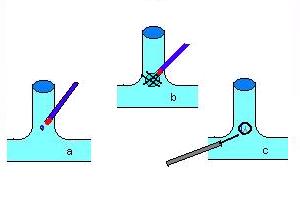
Troubleshooting
Guide T Seals
| Looks Like | Cause and Correction |
 |
Seal is blown out too far. Use smaller flame concentrated exactly on the seal area. Avoid flame splash on tubing away from seal. |
 |
Seal is constricted - not blown out enough. Use sharp flame to heat restricted area and blow out to consistent tube ID. |
 |
Seal is lumpy and/or uneven. Seal was not heated hot enough to flow glass. Reheat seal with sharp intense flame. |
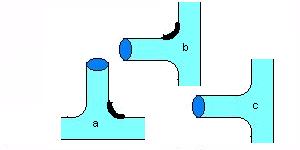 |
(a)Seal has uneven wall thickness. Tube was heated excessively causing glass to flow with gravity. (b) Reorient tube. (c) Reheat seal, gravity flow to correct. |
 |
Leg is tilted - too much heat applied over a large area. Use sharper flame and heat small section at a time. If the intent was to create an angle seal of about 45 degrees - well done! |
 |
Hole! Did not seal completely or blew too hard creating hole. (a) Small hole - Heat the end of a 2 mm rod red hot and quickly stick and pull rod end into hole sealing it shut. Work out seal. (b) If the hole is large you may have to add glass by "weaving" the hole shut, again use 2 mm rod. Try to avoid using an excessive amount of glass with this method. (c) Use a tungsten pick to "sew" the hole shut. Heat only the glass, not the pick. Do not create thin spots using this method. |
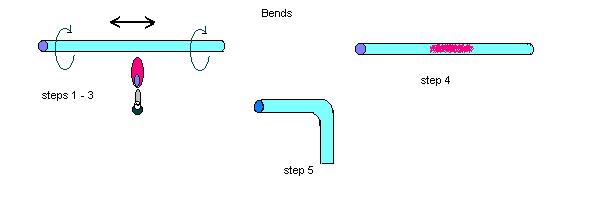
| Bends may be accomplished in two ways. The first involves rotating
the glass tubing in the flame. The second method is used when the glass
cannot be rotated (ex. the glass is attached to a vacuum line), so the
torch flame is moved around the glass.
Option #1 |
| 1. Select 10 mm glass tubing about 16 inches long, blowhose attached at one end, sealed at the other. |
| 2. Adjust flame on torch or burner to a bushy hot flame - between a sharp and annealing setting. |
| 3. Rotate the glass tubing in the flame, simultaneously moving the glass back and forth over a 3 inch range. |
| 4. When the glass has the "feel of a cooked noodle" remove from the flame, stop rotating, and bend. |
| 5. Blow while bending to maintain ID and OD. |
 |
| Option #2 |
| 1. Mount tubing vertically in ring stand. Clamp should be near end (not centered). |
| 2. Attach blow hose to tube at clamp end (a). |
| 3. Using a bushy hot flame, , rotate the torch around the tubing, evenly heating an area of tubing at least 2 inches in length. Hand support tube at (b). |
| 4. When tube softens (cooked noodle) remove torch, bend and blow to maintain ID and OD. |
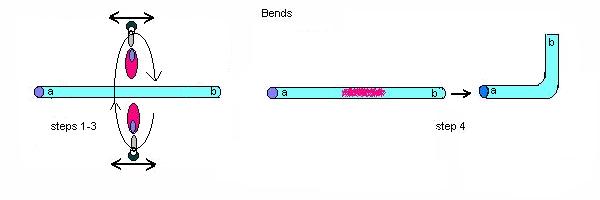 |
| Tip: Try to avoid attaching anything other than a cork at end (b) of the tube prior to bending. Excessive or off balance weight (ex. blowhose) at this end may cause some difficulty in creating a smooth bend. You may want to attempt bends with the tube held in a vertical position as well as the horizontal position shown. |
Silver Plating Glasses:
|
Three Part Solution Mix for Internal Plating |
| Solution 1 | 2 liters distilled water, 50 grams silver nitrate. Store in a dark glass bottle. |
| Solution 2 | 2 liters distilled water, 90 grams potassium hydroxide. |
| Solution 3 | 800 ml distilled water, 80 grams cane sugar, 100 ml ethyl alcohol, 3.5 ml nitric acid. Age 30 days or boil 30 minutes before using. |
|
1 : 2 : 3 = 64% : 32% : 4% by volume |
| Solution Required | Solution 1 | Solution 2 | Solution 3 |
| 50 | 32 | 16 | 2 |
| 100 | 64 | 32 | 4 |
| 150 | 96 | 48 | 6 |
| 200 | 128 | 64 | 8 |
| 250 | 160 | 80 | 10 |
| 300 | 192 | 96 | 12 |
| 400 | 256 | 128 | 16 |
| 500 | 320 | 160 | 20 |
| 600 | 384 | 192 | 24 |
| 700 | 448 | 224 | 28 |
| 800 | 512 | 256 | 32 |
| 900 | 576 | 288 | 36 |
| 1000 | 640 | 320 | 40 |
| 1500 | 960 | 480 | 60 |
| 2000 | 1280 | 640 | 80 |
| To use: Add ammonium hydroxide (by the dropper) to solution 1. Stir
solution while adding the ammonium hydroxide until precipitate clears.
Add solution 2 to 1. Stir solution while adding ammonium until precipitate
is slightly cloudy. Pour solution into glass vessel to be silvered. Add
solution 3, stir/shake.
Warning: Wear protective clothing. Promptly and safely discard unused mixed solutions. |